How to Aim With a Diopter Sight: Precision Target Shooting Guide
Master the basics of diopter sights with this easy-to-follow guide. Learn how to improve accuracy, control your aim, and shoot with greater precision.
How to Aim With a Diopter Sight: Precision Target Shooting Guide
A diopter sight is a precision aiming device. It uses a small aperture placed near your eye to help you line up with your front sight and target.
These sights turn up a lot on target rifles and honestly, they’ve got some real advantages over old-school iron sights. If you learn to aim with a diopter, your accuracy can jump up fast.
To aim, look through the small rear aperture and focus your eye on the front sight element. Then, align both with your target so you’re stacking up concentric circles that share a common center.
The tiny viewing opening naturally centers your eye behind the sight. That makes accurate aiming much simpler than with other systems.
The optical effect from that little hole bumps up your depth of field, so both sights and target come into focus at the same time. It’s a neat trick that really works.
Plenty of new shooters feel unsure about diopters at first, but the technique is more straightforward than it looks. Once you get how diopters line up your eye with the target, you’ll start seeing real improvements in your shooting.
Key Takeaways
- Diopter sights use a small rear aperture that centers your eye for consistent alignment with the front sight
- Focus your aiming eye on the front sight, keep both eyes open, and align the circles for best accuracy
- Getting the right aperture size and accessories can boost your target shooting results a lot
Understanding Diopter Sights and Their Function
The basic idea behind a diopter sight is simple. Put a small aperture close to your eye, and you can line up precisely with the front sight and target.
This system works differently from other sights. It creates optical effects that help you shoot more accurately and cut down on aiming mistakes.
Diopter Sights Versus Other Sighting Systems
A diopter sight is an aperture sight for rifles, airguns, and even crossbows. It puts a small hole right next to your aiming eye.
Open sights need to sit at least 30 centimeters away from your eye to look sharp. Diopters, on the other hand, work best right up close.
With open sights, you have to line up three things: rear sight, front sight, and target. Diopter sights cut that down by automatically centering your eye through the aperture.
Scopes or red dots need batteries or fancy optics. The diopter sight doesn’t. It’s just mechanical—reliable, and that’s why you see it in ISSF competitions.
Key Components: Rear Sight, Diopter Rear Sight, and Aperture Opening
Your diopter rear sight has three main pieces:
- Occluder disc: A round plate about 25 mm wide
- Aperture opening: The small hole in the center
- Adjustment mechanism: Lets you tweak windage and elevation
The size of that aperture matters. You only get the true diopter sight effect if the opening is 1.2 mm or less. Bigger holes are just aperture sights, even though people call them diopters all the time.
Modern diopters let you add stuff—adjustable iris diaphragms, rubber eye shields, and semi-transparent occluders for your off-eye. The fancier models give you windage and elevation adjustments as fine as 2 to 4 mm at 100 meters.
The Diopter Sight Effect and Depth of Field
The diopter sight effect kicks in when light passes through an aperture 1.2 mm or smaller. The light rays come out parallel, kind of like a collimated lens.
This does two things. First, the front sight looks steadier, even if your head moves a bit and your eye isn’t perfectly centered. Second, your depth of field jumps so both sights and the target look sharp together.
You don’t need to focus separately on rear sight, front sight, and target. Just keep your eye on the front sight and let the target stay clear, too. This makes aiming less tiring and helps you stay consistent, which is a big deal in target rifle matches.
Choosing and Setting Up Your Diopter Sighting System
The right front and rear sight parts matter a lot for accuracy. Adjustable features let you fine-tune your sight picture for different light or your own preferences.
Selecting Appropriate Front and Rear Sight Elements
Your diopter rear sight works with a front sight element to make a complete sighting line. The rear sight has an occluder with a small hole that puts your eye right where it should be.
For basic shooting, you might stick with a hooded post or bead up front. But target shooters usually go for globe sight setups with diopter rears—standard stuff in ISSF matches.
The distance between your sights is the sighting line. Longer sighting lines cut down angle errors and let you make finer adjustments. When both sights have click adjustments, each click makes a smaller change to your point of impact if the sights are farther apart.
Try to focus your eye on the front sight element. Keep the rear aperture and target just a little blurry. This keeps your aim steady and your eyes from getting tired during long sessions.
Using Front Sight Tunnels and Globe Sights
A globe sight is a hollow cylinder with a threaded cap. You can swap in different front sight inserts for whatever target or lighting you’re dealing with.
Most shooters use posts of different widths or heights, or rings of varying diameters. Some prefer tinted transparent inserts with a hole in the center—they work like an opaque ring but let you see the target better.
Target front sight tunnels can take extras like adjustable apertures or optical filters. Some high-end brands even put the aperture adjustment right into the tunnel, so you don’t need to mess with separate inserts.
When you pick your front sight insert, make sure there’s enough white space around the bullseye and between your sight elements. If the ring of light is too skinny or dim, centering gets harder, not easier.
Adjustable Aperture and Iris Diaphragm Options
An adjustable iris diaphragm on your diopter rear sight usually gives you apertures from 0.5 to 3.0 mm wide. That lets you adapt to different lighting and still get the diopter effect.
Why mess with adjustable apertures?
- You get a deeper field of focus, so sights and target both look sharp
- It cuts down on glare and reflections
- Lets you control light better as conditions change
- You can pick the size that fits your eyes best
Apertures 1.2 mm or smaller produce the real "diopter sight effect"—they parallelise the light, making your front sight look steady even if your head shifts a bit. That means you don’t have to be absolutely perfect lining up your eye with the rear sight.
Openings bigger than 1.2 mm lose that effect. You’ll need to center your eye consciously for every shot. Still, some folks—especially those with progressive lenses—like bigger apertures anyway, even if it means giving up the automatic centering.
Most target diopters let you add stuff like rubber eye shields, anti-glare tubes, or optical filters to boost contrast for your aiming eye. If you haven’t tried these, it’s worth experimenting to see what helps your vision.
Achieving Optimal Sight Alignment and Sight Picture
Diopter sights really depend on getting your head in the right spot and understanding how the circles line up. Parallax errors can throw off your accuracy, so you’ll want to set the parallax distance for your shooting range.
Head Position and Sighting Line Consistency
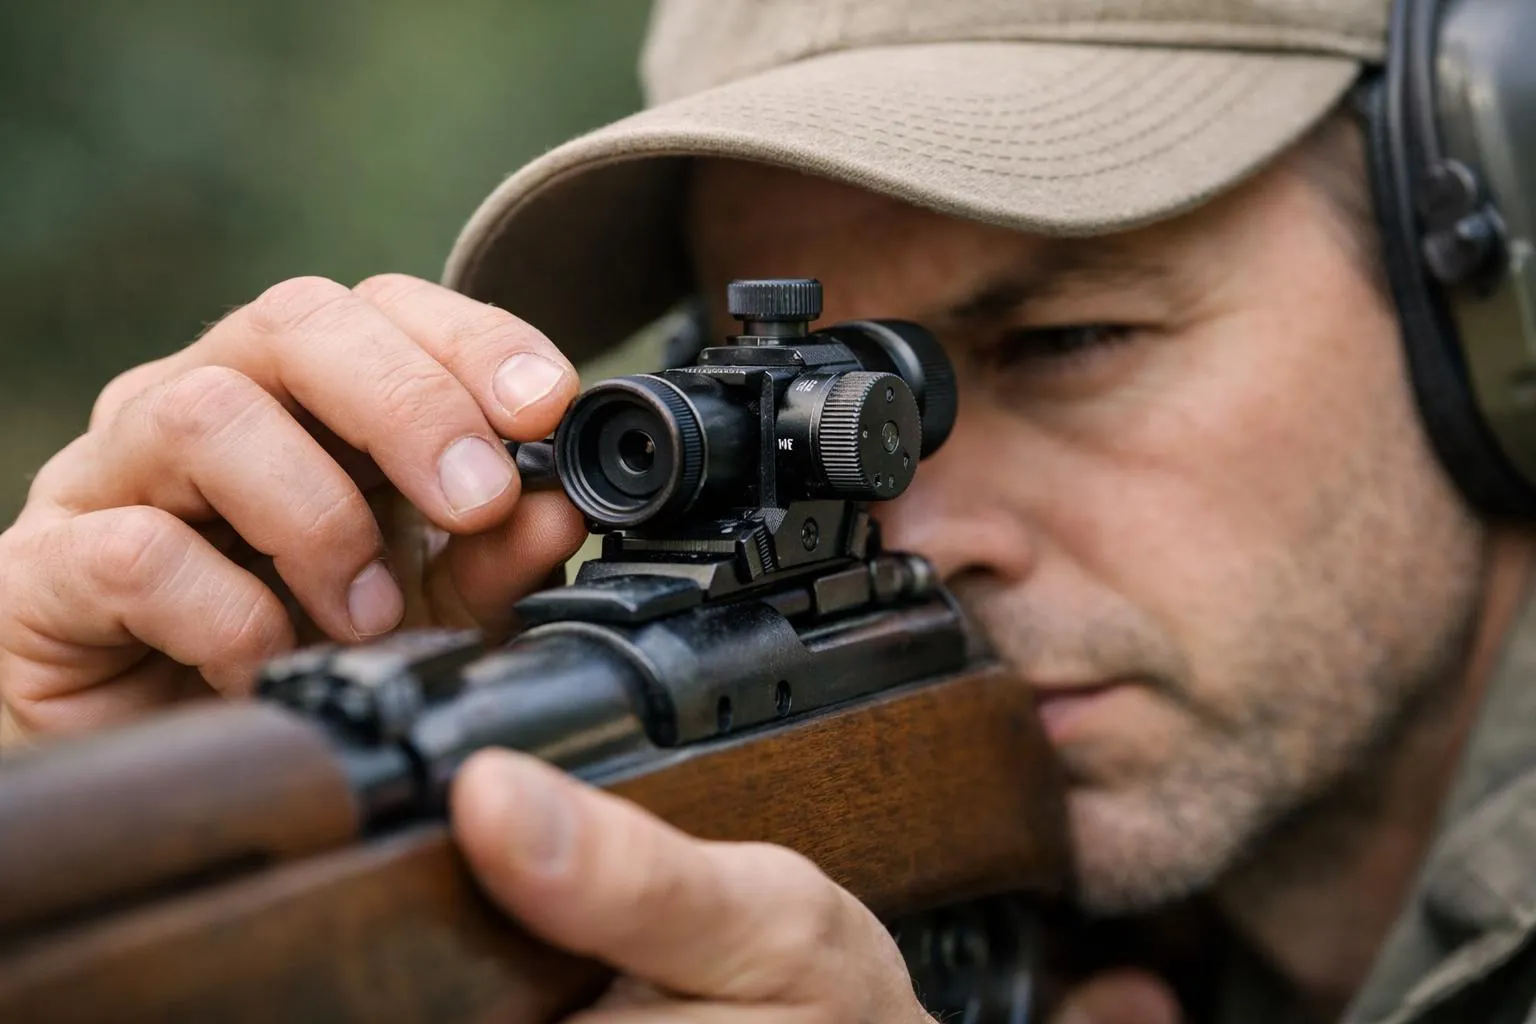
Your head position makes or breaks your sighting line with diopters. You need your eye directly behind the rear aperture, same distance every time.
Press your cheek against the stock in exactly the same spot for each shot. That’s your cheek weld. Your eye should line up with the rear sight naturally, without having to hunt for it.
The sighting line runs from your eye, through the rear aperture, over the front sight, and out to the target. Move your head and that line shifts, changing your point of impact. Try to keep your head upright, not tilted.
Most diopter sights work best when your eye sits about 5-10 centimeters behind the aperture. That’s usually the sweet spot for clarity and proper alignment.
Understanding Sight Alignment With Circles
Diopter sights give you a different sight picture than the old notch-and-post irons. The rear aperture looks like a big circle, and the front insert is a smaller ring.
Center the front ring right inside the rear aperture. You want to see an even border of the rear aperture all around the front ring.
This circle-within-a-circle alignment is key for a sharp, accurate sight picture.
- Keep the spacing around the front ring equal
- Center the front ring both up-down and side-to-side
- Don’t let the rifle tilt or cant
Focus your eye on the front sight element. The target will blur a bit—that’s normal. The collimated lens in many diopter systems can help with eye comfort here, but it’s not a magic fix for everyone.
Avoiding Parallax Error and Setting Parallax Distance
Parallax error pops up when your eye moves behind the rear aperture, making the front sight shift relative to the target. Your point of impact changes, even if you haven’t moved the rifle.
Many adjustable diopters let you set parallax compensation. Dial in the parallax distance to match your target range. Shooting at 50 meters? Set the diopter for 50 meters. That way, front sight and target land on the same focal plane.
To cut down on parallax error:
- Keep your eye position consistent behind the aperture
- Set the diopter’s parallax for your shooting distance
- Use a smaller rear aperture in bright light
- Hold your head steady during the trigger press
To check for parallax, move your head a bit while aiming at a fixed target. If the front sight shifts against the target, you’ve got parallax error. Tweak your diopter’s parallax setting until that movement stops.
Making Precise Adjustments for Accuracy
Getting your shots on target means really dialing in your diopter sight with elevation and windage tweaks. If you understand measurement systems like MOA and MRAD, you’ll find it easier to make those tiny corrections, and proper zeroing keeps your sight lined up with where your shots actually land.
Elevation Adjustment and Windage Adjustment Techniques
Elevation adjustment decides where your shots hit on the vertical axis. When you turn the elevation knob clockwise, your point of impact rises; turn it anticlockwise and it drops.
Windage adjustment shifts your shots left or right. Rotate the windage knob right, and your shots move right—turn it left, and they head left.
Most diopter sights give you click adjustments, each click making a little sound. Every click means a certain angular measurement, which translates to a specific distance at your target.
In 10 metre air rifle competitions, you’re working with super fine adjustments. Even a tiny change at the sight can make a big difference downrange.
Start with bigger adjustments to get close to your zero, then go to single clicks for fine-tuning. Jot down your settings for different distances or conditions, since it’ll save you time later.
Accurate sight adjustment requires reasonably good shot groups before you know which way to adjust.
MOA and MRAD in Target Shooting
MOA (Minute of Angle) and MRAD (Milliradian) are angular units for calculating sight adjustments in target shooting.
One MOA is 1/60th of a degree, about 29mm at 100 metres. One MRAD is 1/1000th of a radian, or 100mm at 100 metres.
Common adjustment values:
- 1 MOA = 29mm at 100m, 2.9mm at 10m
- 1 MRAD = 100mm at 100m, 10mm at 10m
- 0.1 MRAD = 10mm at 100m, 1mm at 10m
Most air rifle diopter sights in ISSF shooting use MRAD-based adjustments. The metric system just makes math simpler for 10 metre events.
If your shots hit 5mm low at 10 metres and your sight adjusts by 0.1 MRAD per click, you need five clicks up. Knowing which system your sight uses saves you headaches and helps you adjust quickly during a match.
Zeroing Your Diopter Sights
Zeroing lines up your diopter sight so your shots go exactly where you aim. Fire a group of three to five shots at your target distance, keeping your technique steady.
Measure how far your group’s center is from your aiming point. Figure out the adjustment using your sight’s click values, and correct both elevation and windage at once.
Fire another group to see if you’re closer to center. Keep making smaller tweaks until your group sits right on your aiming point.
With First Focal Plane reticle scopes, your diopter setting can be crucial for image quality. Once you’ve got your zero, mark your settings or write them down. Changes in temperature or lighting might mean you need to tweak things, but your baseline zero is your anchor for future sessions.
Accessories for Enhanced Diopter Sight Performance
Top-tier target shooting diopters accept all sorts of accessories that make aiming easier and clearer. These extras help with glare, boost depth of field, and let you dial in your sights for any lighting situation.
Rubber Eye Shields, Anti-Glare Tubes, and Optical Filter Systems
A rubber eye shield fits onto your rear diopter sight and blocks out stray light. It creates a tunnel effect, keeping your focus on the front sight and the target—no distractions.
An anti-glare tube sticks out from the rear sight aperture, cutting even more stray light. This helps a lot outdoors or in bright indoor ranges where reflections can mess with your sight picture.
Optical filter systems snap onto high-end diopters to boost contrast for your aiming eye. Filters come in different tints and densities to suit whatever lighting you’re dealing with.
Yellow or amber filters work well in low light, and polarised ones cut glare in bright conditions. Swapping filters is quick, so you can match the light at your shooting venue without any fuss.
Semi-Transparent Occluders and Their Role
A semi-transparent occluder blocks your non-aiming eye, but you don’t have to close it. Keeping both eyes open stops eye fatigue and helps your balance and depth perception.
This accessory mounts to your rear sight and looks like a frosted or milky disc. Your non-aiming eye still picks up light and movement, which feels more natural than squeezing one eye shut. The semi-transparent design keeps your non-aiming eye relaxed while your dominant eye lines up the sights.
Filter Systems and Iris Diaphragms in Different Conditions
An adjustable iris diaphragm replaces the fixed hole in your diopter disc. You can open or close the aperture from 0.5 to 3.0 mm, depending on the light and your preferences.
Smaller apertures (0.5-1.2 mm) give you the classic diopter sight effect—everything looks crisp, both sights and target. Use these in bright conditions or when you want the most precision.
Bigger apertures (1.5-3.0 mm) let in more light for dim ranges, but you’ll need to center your eye more carefully. Combine your iris with filters to fine-tune your sight picture for changing outdoor light.
If the sun keeps shifting, you might open the aperture a bit and add a neutral density filter to keep things bright but sharp. It’s a balancing act, honestly.
Popular Diopter Sight Brands and Competitive Applications
A handful of manufacturers have become the go-to names in precision diopter sights. Their products show up everywhere—from Olympic ranges to club matches, and in all sorts of disciplines: ISSF rifle, airgun, crossbow, you name it.
Notable Manufacturers: Feinwerkbau, Walther, Weihrauch, Diana, Kongsberg Arms
Feinwerkbau is probably the most recognized name in competition shooting gear. Their diopter sights show up on high-end target rifles like the Feinwerkbau 300S, built for 10-metre air rifle matches.
Walther diopters offer advanced adjustment features and often come with rubber eye shields to block glare. These extras help you stay locked in on the target during long sessions.
Weihrauch diopter sights have a reputation for being tough and precise. The Diana diopter throws in anti-glare tubes to cut down on annoying reflections from ambient light.
Kongsberg Arms made the M-51 diopter, used on both military and competition rifles. They built these sights to handle rough conditions and still stay accurate.
Diopter Sights in ISSF and Match Shooting
ISSF rifle events almost always use diopter and globe sighting setups. These matches require crazy precision—sometimes a tenth of a point decides the winner.
Match shooters need sights that let them adjust windage and elevation in 2 to 4 millimetre increments at 100 metres. That kind of control lets you tweak your point of impact shot by shot.
Olympic 10-metre air rifle matches push the gear hard. Shooters use adjustable apertures from 0.5 to 3.0 mm, plus filter systems to boost contrast when it matters most.
The Feinwerkbau P700 PCP air rifle is a good example of what top competitors use at events like the Warrior Games. These rifles pair up precision diopter rears with globe front sights for the best accuracy possible.
Adapting Diopter Sights for Airguns and Crossbows
Airguns and crossbows can really benefit from diopter sights, though you might need to tweak things to get the fit right. Sometimes you’ll have to lower your rear iron sights all the way or take them off to make room for the diopter system.
When you put diopter sights on airguns, make sure you can see the whole front tube circle. That’s how the system works best, and sometimes you’ll need to raise the sight line or use longer mounting hardware.
Target shooting with airguns at 10 metres follows the same diopter rules as centerfire rifles. You can use adjustable iris and filter accessories on airgun diopters, just like on full-bore competition rifles.
Crossbows are a bit trickier, with their shorter sight radius and different stance. Still, precise eye alignment is just as important, making diopter sights a solid choice for accuracy-focused crossbow shooting.
Frequently Asked Questions
Getting the sight picture right and knowing how to adjust are core skills if you’re learning diopter sights. Figuring out aperture size, alignment tricks, and avoiding common aiming mistakes will help you shoot better—no question.
What should the correct diopter sight picture look like for target shooting?
You want to see a clear, centered circle through the rear diopter aperture. Your eye naturally puts the front sight right in the middle of that circle.
The front sight should look sharp and focused, sitting in the center. The target itself might be a little blurry, and that’s completely normal.
Your eye just wants to center things when you look through a small circle. That’s the magic of diopter sights—they make precision aiming feel almost automatic.
How do you adjust a rear diopter sight for windage and elevation?
Most diopter sights have two knobs on the rear assembly. One moves your shots left or right (windage), and the other moves them up or down (elevation).
Turn the windage knob to shift your point of impact left or right. Twist the elevation knob to move it up or down.
Each click usually moves the impact by a set amount at your distance. Check your sight’s specs so you know what each click actually does for you.
Make small adjustments, shoot a test group, then adjust again if you need to. It’s all about dialing in, step by step.
How do you set the diopter aperture size to suit different lighting conditions?
Many adjustable diopter sights let you change the rear aperture size. A bigger aperture lets in more light, which is great for dim conditions.
Go with a smaller aperture in bright light for sharper precision. The smaller opening gives you a cleaner sight picture and cuts down on optical errors.
In low light, open the aperture wider so you can actually see. How close your eye is to the aperture also affects how much light comes through.
Some diopter sights have fixed apertures, while others have rotating discs with different sizes. Pick the one that gives you the clearest front sight and enough light to shoot comfortably.
What is the correct way to align the front element with the rear diopter when aiming?
Look through the rear diopter. Center the front sight element inside the circular opening.
The front element should sit right in the middle of the aperture with equal space all around. If it looks off, adjust until it feels balanced.
Focus your eye directly on the front sight element—not the target. You want that front sight crisp and clear in your vision, even if the target goes a bit fuzzy.
Once you've got the front element centered in the rear aperture, bring this aligned sight onto your target. Your sighting system requires proper alignment of the rear sight, front sight, and aiming mark.
Sometimes you’ll need to lower or remove standard rear iron sights to get a full, clean view of the front tube when using diopter sights. It’s a bit annoying, but it helps.
How do you zero a diopter sight on an air rifle at a chosen distance?
Set up a target at your chosen zero distance. Most folks use 10 meters for indoor shooting, or 25 to 50 meters outdoors.
Fire a group of three to five shots, always aiming at the same spot. Take your time—consistency matters here.
Check where your group landed compared to your point of aim. Measure how far off you are vertically and horizontally.
Turn the elevation knob to move the group up or down. Use the windage knob to shift the group left or right.
Fire another group to see if your adjustments worked. Repeat until your shots are hitting where you want them to.
Jot down your zero settings for different distances. It’s handy to have a reference if you ever change things up later.
What are the most common mistakes that cause shots to drift when using a diopter sight?
Inconsistent head position is a big one. You really need your eye in the same place behind the diopter every single time.
Even a tiny shift in your eye's position changes the alignment between the rear aperture and the front element. The small diopter opening helps center your eye, but it only works if you keep your head steady.
Poor trigger control messes things up, too. If you jerk or yank the trigger, the rifle moves and your shot goes somewhere you didn't plan.
Wind can be sneaky. Even a light breeze will nudge pellets or bullets off course, especially when you're shooting farther out.
If you don't secure the diopter sight tightly, it might shift. Always double-check those adjustment locks after tweaks, or your sight could move while you're shooting.